Blog / Adding variants to collection pages on Shopify
Adding variants to collection pages on Shopify

We talk all the time about how important categories are for eCommerce SEO. But what can you do if you only have a limited amount of products to display on your page? This is where product variants can be a great solution.
Why are variants important for SEO?
There are two great benefits to having robust, well-populated collection pages – not only does it provide a better shopping experience for customers, but it also appeals to search engines. A great example here is the recent leak from Yandex, which contained a piece of code that counts the number of products on a page to help identify if it is a category. On the other hand, we also know that Google frequently soft 404s category pages that have no products. This means that we can’t just go around creating category pages if there’s not enough relevant products in the first place. As a rule of thumb, we aim for at least three products for a collection – it’s enough to provide a decent user experience and avoid any issues with thin content.
Product variants and Shopify
Adding variants is a great solution. These provide customers with a range of options for a single product, such as different sizes, colours, or other attributes. Shopify doesn’t support “variant collections” by default, so we’ll create one using Liquid in the Dawn theme.
Once you’ve completed the steps, your collection should look like this:
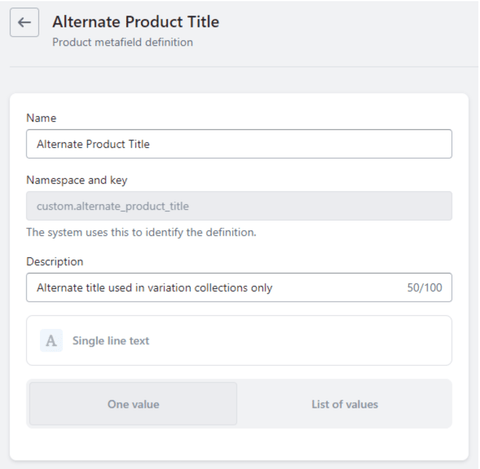
1. Create two new metafields
- A product metafield named Alternate Product Title (namespace/key:
custom.alternate_product_title) - A variant metafield named Show in Variant Collection (namespace/key:
custom.show_in_variant_collection, type: boolean)
2. Duplicate your default collection template
Go to Online Store → Themes → Customise. Open Collections, click Create template, base it on Default collection, and call it variant-collection.
3. Edit the code
In Templates, open collection.variant-collection.liquid and swap the main section include:
{%- comment -%} templates/collection.variant-collection.liquid {%- endcomment -%}
{%- section 'variant-collection-product-grid' -%}
Now make two copies
• In Sections, duplicate main-collection-product-grid.liquid to variant-collection-product-grid.liquid.
• In Snippets, duplicate product-card.liquid to variant-card.liquid.
Open sections/variant-collection-product-grid.liquid and replace the product loop with this version that also renders eligible variants. We keep the standard product card, then append a card per variant that passes your hide/show metafield:
{%- comment -%} sections/variant-collection-product-grid.liquid {%- endcomment -%}
{%- for product in collection.products -%}
  <li class="grid__item">
    {% render 'product-card',
      product_card_product: product,
      media_size: section.settings.image_ratio,
      show_secondary_image: section.settings.show_secondary_image,
      add_image_padding: section.settings.add_image_padding,
      show_vendor: section.settings.show_vendor,
      claim_bar_skin_type: section.settings.claim_bar_skin_type,
      show_claim_bar: section.settings.show_claim_bar
    %}
  </li>

  {%- for variant in product.variants -%}
    {%- if variant.metafields.custom.show_in_variant_collection != false -%}
      <li class="grid__item">
        {% render 'variant-card',
          product_card_product: product,
          product_card_variant: variant,
          title: product.title,
          media_size: section.settings.image_ratio,
          show_secondary_image: section.settings.show_secondary_image,
          add_image_padding: section.settings.add_image_padding,
          show_vendor: section.settings.show_vendor,
          claim_bar_skin_type: section.settings.claim_bar_skin_type,
          show_claim_bar: section.settings.show_claim_bar
        %}
      </li>
    {%- endif -%}
  {%- endfor -%}
{%- endfor -%}
Open snippets/variant-card.liquid and make three tweaks:
1) Link to the specific variant
{%- comment -%} snippets/variant-card.liquid (link) {%- endcomment -%}
<a class="full-unstyled-link"
   href="{{ product_card_product.url }}?variant={{ product_card_variant.id }}">
  {{ title }}
</a>
2) Render price from the variant
{%- comment -%} snippets/variant-card.liquid (price) {%- endcomment -%}
{% render 'price', product: product_card_variant, price_class: '' %}
3) Optional – use an alternate product title
{%- comment -%} snippets/variant-card.liquid (title composition) {%- endcomment -%}
{% assign base_title = product_card_product.metafields.custom.alternate_product_title
   | default: product_card_product.title %}
{{ base_title }} {{ product_card_variant.title }}
4. Create an alternate product title
If you don’t want verbose titles like “Floral Dress sizes 10–16 Size 12”, set the product metafield above and output it as shown – giving you “Floral Dress Size 12”.
5. Switch the theme template
Open the collection you want to display variants for and set its template to variant-collection:
That’s it
You’ve created a variant-aware collection in Shopify. It can lift the usefulness of thin categories, improve UX with size/colour surfacing, and reduce the risk of thin content on high-value pages.


